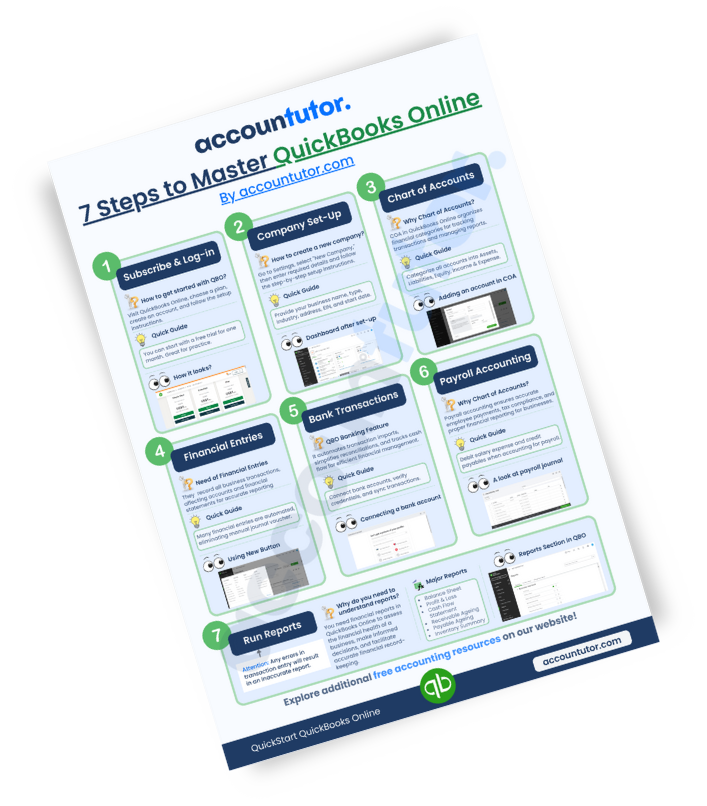
How to Import Inventories in QuickBooks Online: A Step-by-Step Guide
Jan 30

Introduction
Are you struggling to keep your inventory organized and updated in QuickBooks Online? Importing inventories in bulk is a time-saving solution that simplifies your business operations. Whether you’re setting up inventory for the first time or updating existing records, QuickBooks Online’s import tool can help you manage inventory efficiently.
This guide will provide you with step-by-step instructions, tips for a successful import, and common mistakes to avoid. With these strategies, you’ll streamline your inventory management and optimize your bookkeeping process.
This guide will provide you with step-by-step instructions, tips for a successful import, and common mistakes to avoid. With these strategies, you’ll streamline your inventory management and optimize your bookkeeping process.
Why Importing Inventories in QuickBooks Online Matters?
Importing inventory data into QuickBooks Online is essential for:
1. Saving time by uploading bulk inventory items at once.
2. Maintaining accurate stock levels and valuations.
3. Generating precise financial reports and tracking costs.
4. Reducing errors caused by manual data entry.
Efficient inventory management enables you to focus more on growing your business and less on tedious administrative tasks.
Step 1: Prepare Your Inventory Data
Create a Spreadsheet: Use Excel or Google Sheets to organize inventory details. Your columns should include:
1. Product Name
2. SKU (Stock Keeping Unit)
1. Product Name
2. SKU (Stock Keeping Unit)
3. Quantity on Hand
4. Cost
5. Sales Price
6. Income Account (e.g., "Sales Revenue")
7. Expense Account (e.g., "Cost of Goods Sold")
8. Inventory Asset Account
4. Cost
5. Sales Price
6. Income Account (e.g., "Sales Revenue")
7. Expense Account (e.g., "Cost of Goods Sold")
8. Inventory Asset Account
Format the File: Save your spreadsheet in CSV format, as this is required for importing into QuickBooks Online.
Tip: Double-check for typos or missing data to avoid import errors.
Step 2: Navigate to the Import Tool
1. Log in to QuickBooks Online and go to the Settings (gear icon).
2. Under the “Tools” section, select Import Data, then choose Products and Services.
2. Under the “Tools” section, select Import Data, then choose Products and Services.
Step 3: Upload Your Inventory File
1. Select Your File: Click Browse and choose the CSV file you prepared.
2. Map the Fields: Match the columns in your file to QuickBooks fields (e.g., Product Name, Quantity on Hand).
3. Review and Confirm: Ensure all data is mapped correctly before proceeding.
Common Mistake: Skipping the mapping step can result in misplaced or incomplete inventory details.
2. Map the Fields: Match the columns in your file to QuickBooks fields (e.g., Product Name, Quantity on Hand).
3. Review and Confirm: Ensure all data is mapped correctly before proceeding.
Common Mistake: Skipping the mapping step can result in misplaced or incomplete inventory details.
Step 4: Finalize the Import
1. Click Import to upload your inventory data.
2. Review the Results: QuickBooks will display any errors or rows that couldn’t be imported. Fix these issues in your CSV file and re-upload if necessary.
Tip: Use the Products and Services List in QuickBooks Online to verify that all inventory items were imported correctly.
2. Review the Results: QuickBooks will display any errors or rows that couldn’t be imported. Fix these issues in your CSV file and re-upload if necessary.
Tip: Use the Products and Services List in QuickBooks Online to verify that all inventory items were imported correctly.
Step 5: Organize and Update Inventory Records
1. Categorize Inventory: Use product categories to group similar items for easier management.
2. Set Reorder Points: Add low-stock alerts to ensure you never run out of critical inventory items.
3. Update Details as Needed: Review individual inventory records and fill in missing information, such as descriptions or custom fields.
2. Set Reorder Points: Add low-stock alerts to ensure you never run out of critical inventory items.
3. Update Details as Needed: Review individual inventory records and fill in missing information, such as descriptions or custom fields.
Tips for a Successful Inventories Import
Test with a Sample File: Start by importing a smaller dataset to ensure the process works as expected.
Avoid Duplicates: Check for existing inventory items in QuickBooks to prevent duplicate entries.
Keep Data Consistent: Use standardized naming conventions for product names and SKUs.
Avoid Duplicates: Check for existing inventory items in QuickBooks to prevent duplicate entries.
Keep Data Consistent: Use standardized naming conventions for product names and SKUs.
Common Mistakes to Avoid
Incorrect File Format: Ensure your file is saved as a CSV before uploading.
Incomplete Field Mapping: Double-check that all required fields are matched correctly.
Inaccurate Cost or Price Entries: Verify costs and sales prices to maintain accurate inventory valuations.
Incomplete Field Mapping: Double-check that all required fields are matched correctly.
Inaccurate Cost or Price Entries: Verify costs and sales prices to maintain accurate inventory valuations.
Streamline Your Inventory Management
Importing inventories into QuickBooks Online simplifies stock tracking, ensures accurate financial reporting, and helps you avoid common accounting errors. By following this guide, you’ll save time and keep your inventory organized effortlessly.
To master inventory management and other QuickBooks Online features, enroll in the Mastering QuickBooks Online course at Accountutor. This course provides hands-on training, real-world examples, and expert guidance to help you optimize your bookkeeping process.
To master inventory management and other QuickBooks Online features, enroll in the Mastering QuickBooks Online course at Accountutor. This course provides hands-on training, real-world examples, and expert guidance to help you optimize your bookkeeping process.
ONLY FOR YOU: Download QuickBooks Online Cheat Sheet
Why Choose "Mastering QuickBooks Online" from Accountutor?
On-Demand Video Course
4.5 Hours
1 Year Access
Cases &
Practice Sets
Certification by:
accountutor.com
Join 350+ Accounting and Bookkeeping Professionals Mastering QuickBooks Online with accountutor.com
Latest from our blog
Accounting and Bookkeeping courses for you
Subscribe to our newsletter
Stay informed with the latest accounting tips, tools, and updates from Accountutor right in your email inbox.
Thank you!
Policy Pages
Download QuickBooks Online PDF Guide
Thank you!
Download QuickBooks Online Cheat Sheet
Thank you!

Download ABCD of Accounting
Thank you!
Download Checklist 2024
Thank you!
Register For Free!
Thank you!

Download Interview Questions
Thank you!
Register for this webinar: How to Master QuickBooks Online— Without Feeling Overwhelmed
7th JUNE 2025 | 8:00 AM PST | 11:00 AM EST
Thank you! The joining link will be sent to your email shortly!
Webinar joining link will be sent to your email address.
Download QBO Job Interview Questions and Answers PDF
Thank you!
Download Interview Questions
Thank you!

Download 50 Interview Questions For Bookkeepers
Thank you!

Download QuickBooks Online Guidebook
Thank you!
Created with